In the creation of my media products, of which being a Trailer, a poster and also a magazine cover I have used several media technologies. These media technologies range from what is used when creating professional products down to a basic level of technology which is used in the production of amateur media products such as my own. This range in the level of technology can be seen throughout my media pieces from bits being to a amateur level as that is the best we could do with the technologies available.
List of all Softwares used in the Production of Trailer, Poster and Magazine cover
Adobe Photoshop
Adobe Premiere Elements
Garageband
Sketchbook Pro
Final Cut Pro
Adobe Flash
Blogger
Google
Prezi
The Production of the Trailer
The production of my trailer involved many different technologies from the basic through to professional level.
I started the production of the trailer by first drawing a storyboard. However I wanted my storyboard to be clear and definitive as to make it clear to myself and anyone else who needs to see it. To create it I decided to use a program on my laptop which is called Sketchbook Pro, and to draw the individual slides I used a piece of hardware called a Bamboo Tablet, this is a professional graphics tablet, which when connected to a computer you can use a stylus to draw and control the mouse, effectively drawing on the computer. Both of these were very useful and helped to create a very professional looking storyboard. I found that the bamboo tablet allowed for a easy to use piece of hardware which can be used to create a professional piece of work. However the only downfall is it took about 15 minutes to learn how to use to an effective standard. The software used is a free software I downloaded to my Laptop after discovering it on my phone, I found it was really good for doodling or basic sketches which is exactly what I used it for. The computer app was exactly the same which was very useful as I understood how to use it instantly. However the only problem I found was it could only save the pictures into a strange format. So I also downloaded a file converter and converted all of the pictures to a Jpeg which is a very compatible format. I could of used instead a professional piece of software called Photoshop, but I didn't as it wasn't available at the time and purchasing it through the app store was out of our trailers budget so I had to stick with what I already had. Photoshop may have been a useful piece of software to have as it is used by professionals often due to its many in shop tools such as filters, distorters and many others, however these would have been unnecessary as our storyboard only needed basic sketches.


List of all Softwares used in the Production of Trailer, Poster and Magazine cover
Adobe Photoshop
Adobe Premiere Elements
Garageband
Sketchbook Pro
Final Cut Pro
Adobe Flash
Blogger
Prezi
The Production of the Trailer
The production of my trailer involved many different technologies from the basic through to professional level.
I started the production of the trailer by first drawing a storyboard. However I wanted my storyboard to be clear and definitive as to make it clear to myself and anyone else who needs to see it. To create it I decided to use a program on my laptop which is called Sketchbook Pro, and to draw the individual slides I used a piece of hardware called a Bamboo Tablet, this is a professional graphics tablet, which when connected to a computer you can use a stylus to draw and control the mouse, effectively drawing on the computer. Both of these were very useful and helped to create a very professional looking storyboard. I found that the bamboo tablet allowed for a easy to use piece of hardware which can be used to create a professional piece of work. However the only downfall is it took about 15 minutes to learn how to use to an effective standard. The software used is a free software I downloaded to my Laptop after discovering it on my phone, I found it was really good for doodling or basic sketches which is exactly what I used it for. The computer app was exactly the same which was very useful as I understood how to use it instantly. However the only problem I found was it could only save the pictures into a strange format. So I also downloaded a file converter and converted all of the pictures to a Jpeg which is a very compatible format. I could of used instead a professional piece of software called Photoshop, but I didn't as it wasn't available at the time and purchasing it through the app store was out of our trailers budget so I had to stick with what I already had. Photoshop may have been a useful piece of software to have as it is used by professionals often due to its many in shop tools such as filters, distorters and many others, however these would have been unnecessary as our storyboard only needed basic sketches.
Here is the bamboo tablet and stylus.

Here is the start up screen of Sketchbook Pro.

Here is Sketchbook Pro in use.
The next stage in the production of my trailer was the creation of the animatic. An animatic is a preliminary version of a piece of media in which sketches and animated characters are used instead of actors, props and locations. A animatic is made to show someone within the production what the final idea is meant to look like. They can be used to gain funding for the production of the media as if an investor likes the look of a animatic they can pay and this money then can be used to create the media for real. For the production of my animatic I used the already created Jpegs from my Detailed Storyboard and put them into a movie production software. I then chose how long each shot would be and set it up like this. The production software I used was called Adobe Premiere Elements. I mainly used this software because I have previous experience with it, making it easy to use and also easy to create a professional looking finish. However with Premiere Elements I found that it was made with creating proper movies in mind and sometimes found it hard to work with just pictures in it. As an alternate I could of used Adobe flash which can be used to make gifs which are basic moving pictures. However the reason I didn't use it was that it is a specialist software and would take long to understand the software and to be able to use it effectivly would be hard for a amutuer.

Here is Adobe Premiere Elements, the software I used to create my animatic.

Here is Premiere Elements in use.

This was the alternate software I could of used, it is called Adobe Flash
For our film I also created the soundtrack, which took a lot of time as I have never created music. For this I used Garageband and a MIDI keyboard I acquired. With this I created the soundtrack, my skills have expanded massively as I did not know how to use this before but after playing around I released how to use certain tools such as distorts like, Bass booster and treble reduced. Using this software was very beneficial as its helped to create a professional soundtrack.

The next stage in the production of my film trailer was the shooting of the clips. To shoot the footage I used a video camera provided by the school. The camera is a fujifilm, the camera itself is a rugged waterproof camera, which is good as it allowed for the filming to be done outside in all conditions. However I found that the overall quality of the footage wasn't as high as a professional camera would give. This is one possible way in which our film trailer could have been improved, by using a more professional camera instead of a portable handheld camera. Such as the one below, however our budget was tight and we couldn't afford a camera like this which costs start from £1000. If we had a larger budget I feel that this would of been an effective use, as it would of made the overall apperance of the film look alot more professional due to the higher quality footage the camera would produce. However one downfall of using a expensive camera is, you wouldn't feel confident using out doors or in slightly dangerous positions, allowing a greater range of shots on the compact camera however of a lower quality. When making an actual trailer production companies use cameras such as the one below, these cameras are very expensive and film in a very high quality of which is to a standard which is above HD. They use these high quality cameras as a high quality shot is easy to watch, compared to a pixelated shot which is easy for the audience to lose patience with and they will stop paying attention to it. In conclusion if I was to refill the trailer I would of used a higher quality camera if it was available even if it restricted the shots I used as none were dangerous enough for me to not want to use an expensive camera.
This is the Camera we used to film the trailer with.
This is the Tripod that we used when filming our trailer.
This is a camera that is used to film actual movies. It is very expensive and also large.

This is an alternate camera I would of used while filming my trailer if it was available.
The next stage in the production of my trailer is to edit all of the filmed clips together into one two minute long video. To do this you need to connect the camera the camera to a computer with a USB cable. I used the cable that came with the camera as I knew that it would be compatible with the camera and most probably compatible with the computer I used. Another possible way to do this would to eject the memory card and insert this into the computer. I would of used this technique but the computer I used didn't have an SD card slot which means I would of needed an SD to USB converter, which I didn't use this technique. The USB method worked well as it was quick and effective. We also didn't need to pay for anything which is good as for our film we only had a small budget. Once the footage is on the computer I needed to edit it together. For this I decided to use a software that I was familiar with, so I decided upon Adobe Premiere Elements, the same as what I used to edit the Animatic. I decided to use this software as I was already to understand how to use it because of using it for my animatic. I also decided to use Premiere Elements because I already had it available to me. I found that using this software was good for editing the clips together. It is a semi-professional editing software, which is good as this is what I need it for. The software has many effects and transitions allowing for an in depth editing process to occur. Some of the transitions I used were fades, I used these as they allow for a smooth transition between two different scenes, transitions and effects like these allow for a semi-professional finish to be applied to the shots. However as an alternate I could have used a similar editing software for mac computers, which is called Final Cut Pro, I believe that the software would have been able to produce the same standard trailer as I created, however we decided to not use this as it would have restricted the editing process to only one computer where as I have Premiere Elements on every computer I would want to edit at. I could have bought Final Cut Pro for the other computer but this would reach out of our £30 budget.

This is Premiere Elements in use.

This is Adobe Premiere Elements.

This is Final Cut Pro in use.
Our final stage in the production of our trailer is the upload onto the internet to be inserted into our blog. I had an idea by uploading it too youtube and then uploading this too my blog. However I noticed while editing the trailer in Adobe Elements that you could upload straight to Youtube straight from the software. I decided to use this technique of uploading it and it was very successful, you click a few buttons and write a description and its done. Overall I found this technique of uploading the trailer very quick and easy. If I was to do it again, I would defiantly use this technique again.
The Production of the Poster and Magazine Cover
The production of the poster and magazine was the same process so I will analyse the process at the same time.
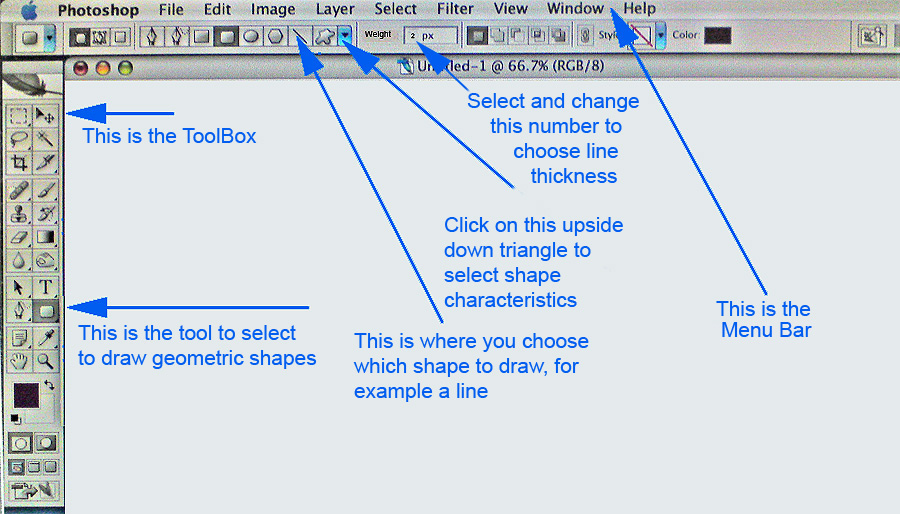
To begin with I started with making many basic designs of what I had in mind, I created these by using Adobe photoshop, a graphic design software. I had ideas of what to do at looking at examples of other real posters and covers and analysing them and finding the conventions and then using these while designing my mock posters and covers. Photoshop is a professional graphic design software, it had many effects you can use, which is why I chose to use it as it would allow for a wide range of products to use. While creating these I watched several tutorials on how to use tools such as, magic wand, filters and distorters. For example I used the magic wand effect to select the Empire title, i then selected the inverse of this and deleted it leaving just the title, I then created the rest of the magazine from this. Before trying to create this I didn't know how to use this tool so it has created my knowledge of photoshop. There were a few other options I could of used to create these, one being paint. Paint is a very basic software with a limited range of tools, however I am fluent in it. However I decided against this as it would lead to a very narrow and amateur finish.


There are several other softwares which have been used but not mentioned such as Prezi, an online Mood board creator, Blogger, the online software which this is on, it is used to write my blog on and also google which I used for research.
No comments:
Post a Comment